How to Set DNS Nameservers on Ubuntu 18.04
Published on
•4 min read

The Domain Name System (DNS) is a central part of the web’s infrastructure, providing a way to translate domain names into IP addresses. You can think of the DNS as the Internet’s phone book.
Each device connected to the Internet is uniquely identified by its IP Address. When you type in the web site you want to visit in your browser, its domain name must be translated into its corresponding IP Address. The operating system first checks its hosts file for the corresponding domain and if there is no entry for the domain, it will query the configured DNS nameservers to resolve the specified domain name.
Once the domain is resolved the system will cache the request and keep a record for the domain and the corresponding IP address.
The DNS nameservers (resolvers) are servers which are used by other devices to perform DNS lookup for a requested domain.
Usually, the DNS resolvers are assigned by your ISP. However, these resolvers may be slow or not regularly updated which can cause a lag when querying for a domain, resolving to a wrong IP address or sometimes you may not be able to resolve the desired domain at all.
There are plenty of free public DNS resolvers which are fast, private and are regularly updated.
Below are some of the most popular public DNS resolvers:
- Google (8.8.8.8, 8.8.4.4)
- Cloudflare (1.1.1.1 and 1.0.0.1)
- OpenDNS (208.67.222.222, 208.67.220.220)
- Level3 (209.244.0.3, 209.244.0.4)
In this guide, we’ll explain how to configure the DNS nameservers (resolvers) on Ubuntu 18.04.
Setting DNS Nameservers on Ubuntu Desktop
Setting up DNS nameservers on Ubuntu 18.04 Desktop computers is super easy and requires no technical knowledge.
Launch the Settings window.
If you are connected to a WiFi network click on the “Wi-FI” tab. Otherwise, if you have a wired connection click on the “Network” tab.
Select the connection for which you want to set the DNS nameservers and click on the cog icon to open the Network Manager.
Select the IPv4 Settings tab.
Disable the “Automatic” toggle switch and enter the DNS resolvers IP addresses, separated by a comma. We’ll use the Google DNS nameservers:
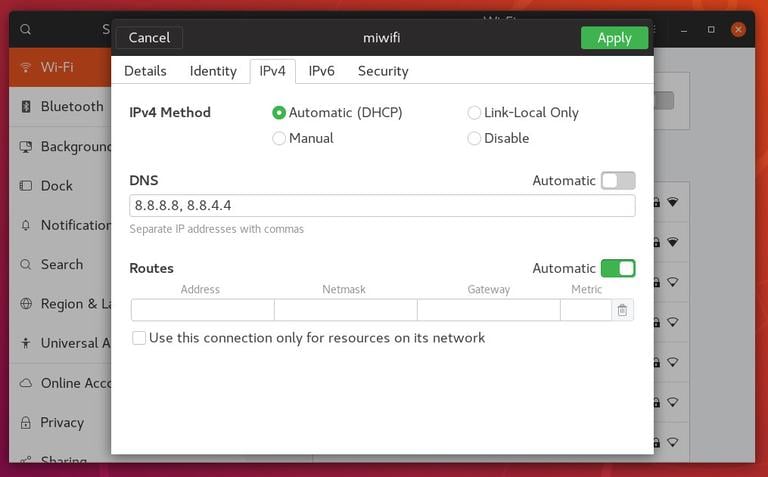
Click on the “Apply” button to save the changes.
The changes take effect immediately except in cases where the DNS entries are cached by your system or application.
If you want to switch back to your old settings, open the Network Manager, go to IPv4 Settings and enable the “Automatic” toggle switch.
Setting DNS Nameservers on Ubuntu Server
Back in the days, whenever you wanted to configure DNS resolvers in Linux you would simply open the /etc/resolv.conf file, edit the entries, save the file and you are good to go. This file still exists but it is a symlink
controlled by the systemd-resolved service and should not be edited manually.
systemd-resolved is a service that provides DNS name resolution to local services and applications and it can be configured with Netplan , the default network management tool on Ubuntu 18.04.
Netplan configuration files are stored in the /etc/netplan directory. You’ll probably find one or two YAML files in this directory. The file name may differ from setup to setup. Usually, the file is named either 01-netcfg.yaml or 50-cloud-init.yaml but in your system, it may be different.
These files allow you to configure the network interface, including the IP address, gateway, DNS nameservers, and so on.
To configure the DNS nameservers open the interface configuration file with your text editor :
sudo nano /etc/netplan/01-netcfg.yamlThe file’s contents will look something like the following:
network:
  version: 2
  renderer: networkd
  ethernets:
    ens3:
      dhcp4: no
      addresses:
        - 192.168.121.199/24
      gateway4: 192.168.121.1
      nameservers:
          addresses: [8.8.8.8, 8.8.4.4]
To configure the interface’s DNS nameservers change the current IP addresses with your preferred DNS servers. For example, if you want to use Cloudflare’s DNS servers, you would change the addresses line to:
      nameservers:
          addresses: [1.1.1.1, 1.0.0.1]
DNS servers must be comma-separated. You can also add more than two nameservers.
If the entry doesn’t exist add it under the interface name block. When editing Yaml files make sure you follow the YAML code indent standards . If there is a syntax error in the configuration, Netplan will not be able to parse the file.
Once done save the file and apply the changes with:
sudo netplan applyNetplan will generate the configuration files for the systemd-resolved service.
To verify that the new DNS resolvers are set, run the following command:
systemd-resolve --status | grep 'DNS Servers' -A2systemd-resolve -status prints a lot of information. We are using grep
to filter the “DNS Servers” string. The output will look something like this:
         DNS Servers: 1.1.1.1
                      1.0.0.1
Conclusion
Netplan is the default network management tool on Ubuntu 18.04, replacing the /etc/resolv.conf and /etc/network/interfaces configuration files that have been used to configure the network in the previous Ubuntu versions.