How to Install and Configure Squid Proxy on Ubuntu 20.04

Squid is a full-featured caching proxy supporting popular network protocols like HTTP, HTTPS, FTP, and more. It can be used to improve the web server’s performance by caching repeated requests, filter web traffic, and access geo-restricted content.
This tutorial explains how to set up a Squid Proxy on Ubuntu 20.04 and configure Firefox and Google Chrome web browsers to use it.
Installing Squid on Ubuntu
The squid package is included in the standard Ubuntu 20.04 repositories. To install it, run the following commands as sudo user :
sudo apt update
sudo apt install squid
Once the installation is completed, the Squid service will start automatically. To verify it, check the service status:
sudo systemctl status squidThe output will look something like this:
● squid.service - Squid Web Proxy Server
     Loaded: loaded (/lib/systemd/system/squid.service; enabled; vendor preset: enabled)
     Active: active (running) since Fri 2020-10-23 19:02:43 UTC; 14s ago
       Docs: man:squid(8)
...
Configuring Squid
The squid service can be configured by editing the /etc/squid/squid.conf file. The configuration file contains comments that describe what each configuration option does. You can also put your configuration settings in separate files, which can be included in the main configuration file using the “include” directive.
Before making any changes, it is recommended to back up the original configuration file:
sudo cp /etc/squid/squid.conf{,.orginal}To start configuring your squid instance, open the file in your text editor :
sudo nano /etc/squid/squid.confBy default, squid is set to listen on port 3128 on all network interfaces on the server.
If you want to change the port and set a listening interface, locate the line starting with http_port and specify the interface IP address and the new port. If no interface is specified Squid will listen on all interfaces.
# Squid normally listens to port 3128
http_port IP_ADDR:PORT
Running Squid on all interfaces and on the default port should be fine for most users.
Squid allows you to control how the clients can access the web resources using Access Control Lists (ACLs). By default, access is permitted only from the localhost.
If all clients who use the proxy have a static IP address, the simplest option to restrict access to the proxy server is to create an ACL that will include the allowed IPs. Otherwise, you can set squid to use authentication.
Instead of adding the IP addresses in the main configuration file, create a new dedicated file that will hold the allowed IPs:
192.168.33.1
# All other allowed IPs
Once done, open the main configuration file and create a new ACL named allowed_ips (first highlighted line) and allow access to that ACL using the http_access directive (second highlighted line):
# ...
acl allowed_ips src "/etc/squid/allowed_ips.txt"
# ...
#http_access allow localnet
http_access allow localhost
http_access allow allowed_ips
# And finally deny all other access to this proxy
http_access deny all
The order of the http_access rules is important. Make sure you add the line before http_access deny all.
The http_access directive works in a similar way as the firewall rules. Squid reads the rules from top to bottom, and when a rule matches, the rules below are not processed.
Whenever you make changes to the configuration file, you need to restart the Squid service for the changes to take effect:
sudo systemctl restart squidSquid Authentication
If restricting access based on IP doesn’t work for your use case, you can configure squid to use a back-end to authenticate users. Squid supports Samba , LDAP, and HTTP basic auth.
In this guide, we’ll use basic auth. It is a simple authentication method built into the HTTP protocol.
To generate a crypted password, use the openssl tool. The following command appends the USERNAME:PASSWORD pair to the /etc/squid/htpasswd file:
printf "USERNAME:$(openssl passwd -crypt PASSWORD)\n" | sudo tee -a /etc/squid/htpasswdFor example, to create a user “josh” with password “P@ssvv0rT”, you would run:
printf "josh:$(openssl passwd -crypt 'P@ssvv0rd')\n" | sudo tee -a /etc/squid/htpasswdjosh:QMxVjdyPchJl6The next step is to enable the HTTP basic authentication and include the file containing the user credentials to the squid configuration file.
Open the main configuration and add the following:
sudo nano /etc/squid/squid.conf# ...
auth_param basic program /usr/lib/squid3/basic_ncsa_auth /etc/squid/htpasswd
auth_param basic realm proxy
acl authenticated proxy_auth REQUIRED
# ...
#http_access allow localnet
http_access allow localhost
http_access allow authenticated
# And finally deny all other access to this proxy
http_access deny allThe first three highlighted lines are creating a new ACL named authenticated, and the last highlighted line is allowing access to authenticated users.
Restart the Squid service:
sudo systemctl restart squidConfiguring firewall
To open the Squid ports, enable the UFW
‘Squid’ profile:
sudo ufw allow 'Squid'If Squid is running on another, non-default port, for example, 8888 you can allow traffic on that port with: sudo ufw allow 8888/tcp.
Configuring Your Browser to Use Proxy
Now that you have Squid set up, the last step is to configure your preferred browser to use it.
Firefox
The steps below are the same for Windows, macOS, and Linux.
In the upper right-hand corner, click on the hamburger icon
☰to open Firefox’s menu:Click on the
⚙ Preferenceslink.Scroll down to the
Network Settingssection and click on theSettings...button.A new window will open.
- Select the
Manual proxy configurationradio button. - Enter your Squid server IP address in the
HTTP Hostfield and3128in thePortfield. - Select the
Use this proxy server for all protocolscheckbox. - Click on the
OKbutton to save the settings.
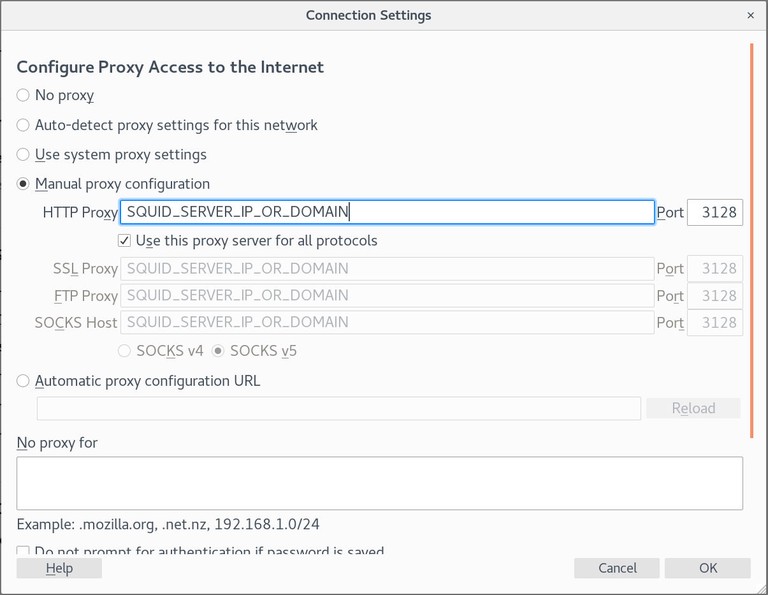
- Select the

At this point, your Firefox is configured, and you can browse the Internet through the Squid proxy. To verify it, open google.com, type “what is my ip” and you should see your Squid server IP address.
To revert back to the default settings, go to Network Settings, select the Use system proxy settings radio button and save the settings.
There are several plugins that can also help you to configure Firefox’s proxy settings, such as FoxyProxy .
Google Chrome
Google Chrome uses the default system proxy settings. Instead of changing your operating system proxy settings, you can either use an addon such as SwitchyOmega or start Chrome web browser from the command line.
To launch Chrome using a new profile and connect to the Squid server, use the following command:
Linux :
/usr/bin/google-chrome \
    --user-data-dir="$HOME/proxy-profile" \
    --proxy-server="http://SQUID_IP:3128"
macOS :
"/Applications/Google Chrome.app/Contents/MacOS/Google Chrome" \
    --user-data-dir="$HOME/proxy-profile" \
    --proxy-server="http://SQUID_IP:3128"
Windows :
"C:\Program Files (x86)\Google\Chrome\Application\chrome.exe" ^
    --user-data-dir="%USERPROFILE%\proxy-profile" ^
    --proxy-server="http://SQUID_IP:3128"
The profile will be created automatically if it does not exist. This way you can run multiple instances of Chrome at the same time.
To confirm the proxy server is working properly, open google.com, and type “what is my ip”. The IP shown in your browser should be the IP address of your server.
Conclusion
Squid is one of the most popular proxy caching servers. It improves the speed of the web server and can help you take restrict user access to the Internet.
We’ve shown you how to install and configure Squid on Ubuntu 20.04 and set up your browser to use it.
If you hit a problem or have feedback, leave a comment below.
Linuxize Weekly Newsletter
A quick weekly roundup of new tutorials, news, and tips.
About the authors

Dejan Panovski
Dejan Panovski is the founder of Linuxize, an RHCSA-certified Linux system administrator and DevOps engineer based in Skopje, Macedonia. Author of 800+ Linux tutorials with 20+ years of experience turning complex Linux tasks into clear, reliable guides.
View author page