How to Flush DNS Cache on Linux, Windows, macOS, and Chrome

DNS cache is a temporary database that stores information about previous DNS lookups. In other words, whenever you visit a website, your OS and web browser will keep a record for the domain and the corresponding IP address. This eliminates the need for repetitive queries to the remote DNS servers and allows your OS or browser to resolve the website’s URL quickly.
However, in some situations like troubleshooting network issues or after changing DNS resolvers, you will need to flush the DNS cache. This will clear the cached DNS entries and perform a subsequent lookup to resolve the domain based on newly configured DNS settings.
This article provides instructions on how to flush the DNS cache on Linux, Windows, and macOS, and in web browsers.
Quick Reference
| System | Command or page |
|---|---|
| Linux (systemd-resolved) | sudo resolvectl flush-caches |
| Linux (dnsmasq) | sudo systemctl restart dnsmasq |
| Linux (nscd) | sudo nscd -i hosts |
| Windows | ipconfig /flushdns |
| macOS | sudo dscacheutil -flushcache; sudo killall -HUP mDNSResponder |
| Google Chrome | chrome://net-internals/#dns |
| Microsoft Edge | edge://net-internals/#dns |
| Firefox | about:networking#dns |
Flushing the DNS Cache on Linux
On Linux, there is no OS-level DNS caching unless a caching service such as systemd-resolved, dnsmasq, or nscd is installed and running. The process of clearing the DNS cache depends on the caching service your system uses.
systemd-resolved
Ubuntu and Fedora use the systemd-resolved service to cache DNS entries.
To find out whether the service is running, use the following command:
systemctl is-active systemd-resolved.serviceIf the service is running, the command will print active. Otherwise, you will see inactive.
To clear the systemd-resolved DNS cache, type:
sudo resolvectl flush-cachesOn success, the command does not print any output.
You may still see systemd-resolve --flush-caches in older guides. That command was removed in newer systemd releases, and on Ubuntu 26.04 it fails with “command not found”.
To confirm that the cache is empty, check the resolver statistics:
sudo resolvectl statisticsThe Cache section of the output will look something like this:
Cache
                         Current Cache Size:  0
                                 Cache Hits: 10
                               Cache Misses: 45
Current Cache Size is the number of entries in the cache. After a flush, it drops to 0. The Cache Hits and Cache Misses counters are not reset.
dnsmasq
Dnsmasq is a lightweight DHCP and DNS caching nameserver.
If your system is using dnsmasq as a caching server, restart the service to clear the DNS cache:
sudo systemctl restart dnsmasq.serviceYou can also clear the cache without a restart. When dnsmasq receives the HUP signal, it empties its cache and rereads /etc/hosts. Send the signal with the killall
command:
sudo killall -HUP dnsmasqOn desktop systems, NetworkManager can run its own dnsmasq instance (dns=dnsmasq in NetworkManager.conf). In that case, there is no dnsmasq.service to restart, but the killall -HUP dnsmasq command still clears the cache.
nscd
Nscd is a caching daemon found on older RHEL-based systems and some other distributions.
If your system is using nscd, clear its hosts cache with:
sudo nscd -i hostsThe -i option invalidates a single cache table, in this case hosts. To clear all nscd caches, restart the service:
sudo systemctl restart nscd.serviceFlushing the DNS Cache on Windows
The process of clearing the DNS cache is the same for all Windows versions. You need to open the Command Prompt with administrator privileges and run ipconfig /flushdns.
To clear the DNS cache in Windows 11 and Windows 10, perform the following steps:
Type cmd in the Windows search bar.
Right-click on Command Prompt and click Run as administrator. This will open up the Command Prompt window.
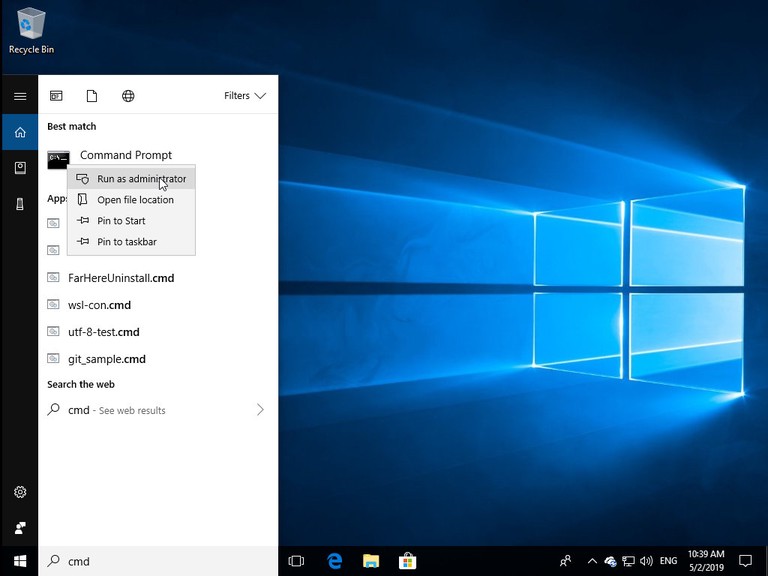
On the command line, type the following line and press Enter:
shipconfig /flushdnsOn success, the system will return the following message:
outputWindows IP Configuration Successfully flushed the DNS Resolver Cache.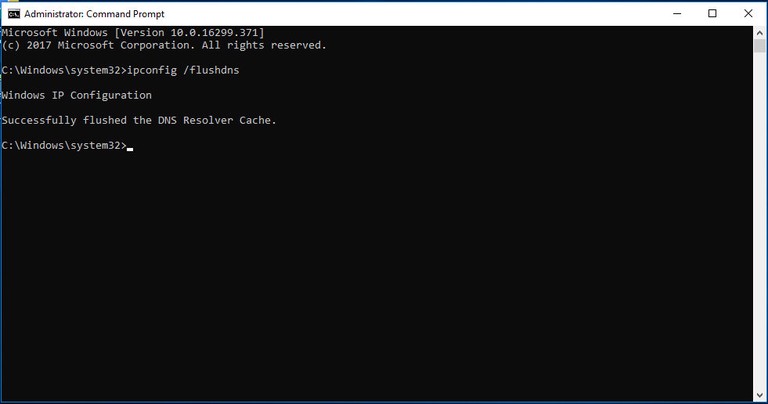


If you prefer PowerShell, open it as administrator and run:
Clear-DnsClientCacheThe cmdlet does the same job as ipconfig /flushdns and prints no output. To see which entries are currently in the cache, run ipconfig /displaydns.
Flushing the DNS Cache on macOS
The command to flush the DNS cache must be executed as a user with administrator privileges.
To clear the DNS cache in macOS, perform the following steps:
Open the Terminal. You can find it in Finder under Applications > Utilities, or search for it with Spotlight (
Cmd+Space).Type the following command and press Enter:
Terminalsudo dscacheutil -flushcache; sudo killall -HUP mDNSResponderEnter your password and hit Enter again. On success, the system does not return any message.
The dscacheutil -flushcache command clears the directory service cache. The killall -HUP mDNSResponder command tells mDNSResponder, the macOS DNS service, to drop its cached entries. Older macOS versions used different commands, but this one works on all current releases.
Clearing the Browser DNS Cache
Most web browsers keep their own DNS cache on top of the operating system cache. If a site still loads from the old address after you flush the system cache, the browser cache is the next place to look.
Google Chrome
Chrome keeps its own DNS cache, separate from the operating system. To clear Google Chrome’s DNS cache, perform the following steps:
- Open a new tab, type
chrome://net-internals/#dnsin the address bar, and press Enter. - Click the “Clear host cache” button.
- Open
chrome://net-internals/#socketsand click “Flush socket pools”.
The third step matters because Chrome reuses open connections. Without it, the browser can keep talking to the old IP address until those connections close, even though the host cache is empty.
If Chrome uses Secure DNS (Settings > Privacy and security > Security > Use secure DNS), it sends lookups to its DNS-over-HTTPS provider instead of the system resolver. In that case, flushing the operating system cache has no effect on Chrome, and clearing the host cache as shown above is the step that counts.
Other Chromium-based browsers use the same page under their own URL scheme:
- Microsoft Edge:
edge://net-internals/#dns - Brave:
brave://net-internals/#dns - Opera:
opera://net-internals/#dns - Vivaldi:
vivaldi://net-internals/#dns
If the site still does not load correctly, the problem may be stale cached content rather than DNS. Clear the browser cache:
- Open the “Clear browsing data” dialog with
Ctrl+Shift+Del(Cmd+Shift+Deleteon macOS). - Choose a time range. Select “All time” to delete everything.
- Check the “Cached images and files” box. Leave “Cookies and other site data” unchecked unless you want to be signed out of every site.
- Click the “Delete data” button.
Firefox
To clear Firefox’s DNS cache, perform the following steps:
- Open a new tab, type
about:networking#dnsin the address bar, and press Enter. - Click the “Clear DNS Cache” button.
If that does not work for you, clear the browser cache. Press Ctrl+Shift+Del (Cmd+Shift+Delete on macOS), select “Everything” as the time range, check the cache box, and confirm. Checking the cookies box as well will sign you out of every site.
Troubleshooting
“systemd-resolve: command not found”
Newer systemd releases no longer ship the systemd-resolve command. Use sudo resolvectl flush-caches instead.
The old IP address comes back after a flush
Check the hosts file for an entry for the domain. The hosts file has priority over DNS, and flushing the cache does not change it. See how to edit your hosts file
for the file location on each system. If the hosts file is clean, your router or upstream DNS server may still cache the old record until its TTL expires.
The browser ignores the flush
Chrome, Edge, and Firefox can send DNS queries over HTTPS to their own provider instead of the system resolver. Clear the browser’s own cache from the net-internals or about:networking page, then restart the browser.
“InteractiveAuthenticationRequired” when running resolvectl statistics
The resolvectl statistics command needs root privileges. Run it with sudo.
Conclusion
The command you need depends on the caching service your system runs, and browsers keep a separate cache on top of it. To check what a domain resolves to after a flush, use the dig
or nslookup
command.
Tags
Linuxize Weekly Newsletter
A quick weekly roundup of new tutorials, news, and tips.
About the authors

Dejan Panovski
Dejan Panovski is the founder of Linuxize, an RHCSA-certified Linux system administrator and DevOps engineer based in Skopje, Macedonia. Author of 1000+ Linux tutorials with 20+ years of experience turning complex Linux tasks into clear, reliable guides.
View author page