How to Connect to MySQL through SSH Tunnel

By default, the MySQL server listens for connections only on localhost, which means it can be accessed only by applications running on the same host.
When you need to reach the database from your own machine, one option is to configure the MySQL server to allow remote connections . That requires opening the database port to the network, which increases the attack surface and needs careful firewall and user-privilege management.
A safer alternative is to create an SSH tunnel from your local system to the server. SSH tunneling forwards a local port over an encrypted SSH connection to a port on the remote machine, so the database traffic travels inside the existing SSH session and no extra port is exposed.
This guide explains how to create an SSH tunnel and connect to a remote MySQL server from Linux, macOS, and Windows. The same steps apply to MariaDB.
Quick Reference
| Task | Command |
|---|---|
| Open a tunnel (local 3336 to remote 3306) | ssh -N -L 3336:127.0.0.1:3306 user@server_ip |
| Open the tunnel in the background | ssh -f -N -L 3336:127.0.0.1:3306 user@server_ip |
| Use a non-default SSH port | ssh -N -p 2222 -L 3336:127.0.0.1:3306 user@server_ip |
| Connect the client through the tunnel | mysql -u db_user -p -h 127.0.0.1 -P 3336 |
| Close a foreground tunnel | Ctrl+C in the tunnel terminal |
For a printable quick reference, see the SSH cheatsheet .
Prerequisites
Before you start, make sure you have:
- An SSH client on your local machine.
- SSH access to the server where MySQL or MariaDB runs.
- A MySQL user whose host entry matches a loopback connection on the server. This is commonly an account such as
db_user@localhost; whenskip_name_resolveis enabled, you may need a matchingdb_user@127.0.0.1account instead.
How an SSH Tunnel Works
The tunnel maps a port on your local machine to a port on the remote server through the SSH connection. You point your database client at the local port, SSH forwards the traffic to the server, and the server delivers it to MySQL on its own loopback interface.
Because MySQL still receives the connection on 127.0.0.1, you do not need to change its bind-address or open port 3306 to the network. These steps work with current MySQL releases, including the 8.0 and 8.4 LTS series, and with MariaDB.
Create an SSH Tunnel on Linux and macOS
The ssh
client is preinstalled on most Linux and Unix-like systems, including macOS.
To create the tunnel, run the following command:
ssh -N -L 3336:127.0.0.1:3306 user@server_ipThe options work as follows:
-N- Do not execute a remote command, only forward the port.-L 3336:127.0.0.1:3306- Set up local port forwarding in the formLOCAL_PORT:DESTINATION_HOST:DESTINATION_PORT. Here3336is the port opened on your local machine,127.0.0.1is the destination host as seen from the server (its loopback interface), and3306is the MySQL port on the server.user@server_ip- The SSH user and the IP address or hostname of the remote server.
We use local port 3336 so the tunnel does not clash with a MySQL instance that may already be running on 3306 on your own machine. You can pick any free local port.
Add the -f option to send the tunnel to the background, and use -p to connect to an SSH server listening on a non-default port
:
ssh -f -N -p 2222 -L 3336:127.0.0.1:3306 user@server_ipWhen you run the command, you will be prompted for your SSH password unless you have set up SSH key-based authentication , which is the recommended way to connect.
With the tunnel open, point your local MySQL client at 127.0.0.1 on port 3336. For example, to connect with the command-line mysql client:
mysql -u db_user -p -h 127.0.0.1 -P 3336Here db_user is a MySQL user that is allowed to access the database on the server. The -P 3336 option is important: it tells the client to use the tunnel instead of a local MySQL instance. On recent MariaDB systems the client binary is named mariadb, so you can run mariadb -u db_user -p -h 127.0.0.1 -P 3336 instead.
When prompted, enter the MySQL user password. To close a foreground tunnel, press Ctrl+C in the terminal where the SSH client is running.
Keeping the Tunnel Open
A plain SSH tunnel closes when the SSH client detects that the connection has dropped. If you need a long-lived tunnel, use autossh with OpenSSH keepalives so a stalled connection exits and can be restarted:
autossh -M 0 -f -N \
  -o ServerAliveInterval=30 \
  -o ServerAliveCountMax=3 \
  -o ExitOnForwardFailure=yes \
  -L 3336:127.0.0.1:3306 user@server_ip
The -M 0 option disables autossh’s separate monitoring ports. The OpenSSH keepalive options make ssh exit after three unanswered checks, allowing autossh to restart it. ExitOnForwardFailure=yes prevents the process from continuing when the tunnel cannot be established.
Install autossh with sudo apt install autossh on Ubuntu, Debian, and derivatives, or sudo dnf install autossh on Fedora, RHEL, and derivatives.
Create an SSH Tunnel on Windows
Windows 10 and later include the OpenSSH client, so you can run the same ssh -N -L 3336:127.0.0.1:3306 user@server_ip command from PowerShell or the Command Prompt. If you prefer a graphical client, PuTTY is the most popular option. Download it from the PuTTY download page
.
To create the tunnel with PuTTY:
Launch PuTTY and enter the IP address of the server in the
Host Name (or IP address)field: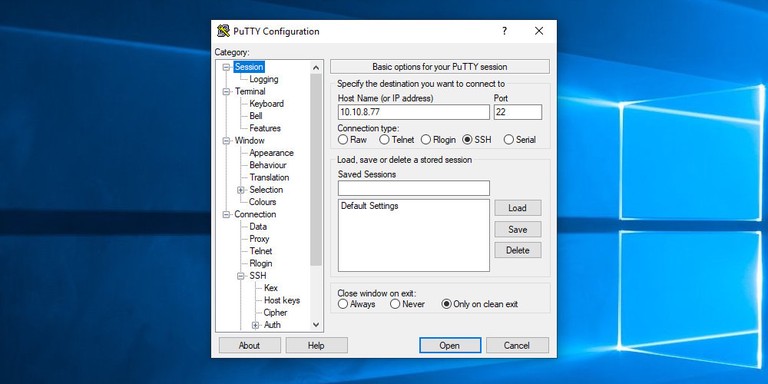
Under the
Connectionmenu, expandSSHand selectTunnels. Enter3336in theSource portfield and127.0.0.1:3306in theDestinationfield, then clickAdd: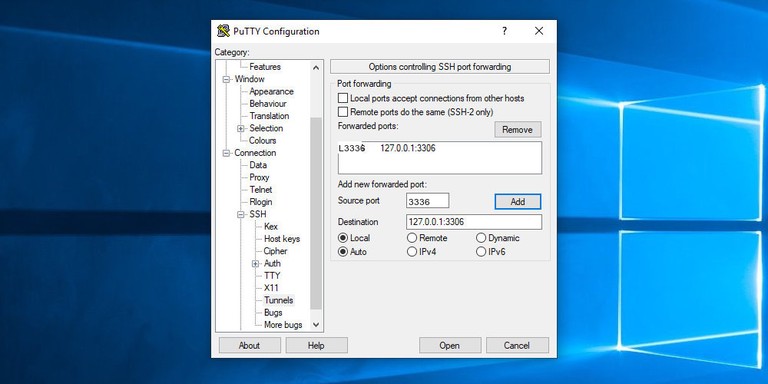
Go back to the
Sessionpage and save the settings so you do not need to enter them again. Type a name in theSaved Sessionsfield and clickSave: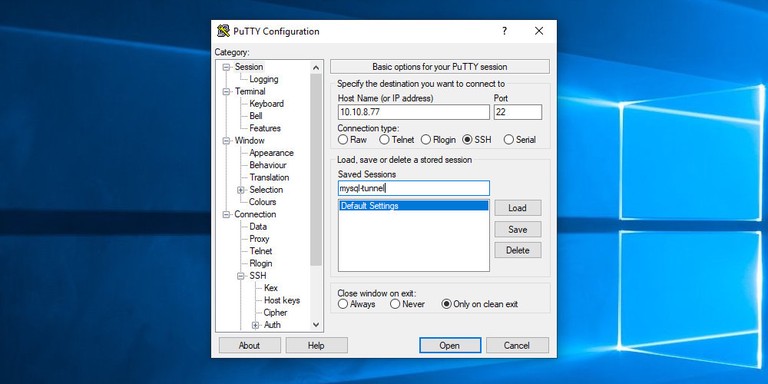
Select the saved session and click
Opento log in to the remote server: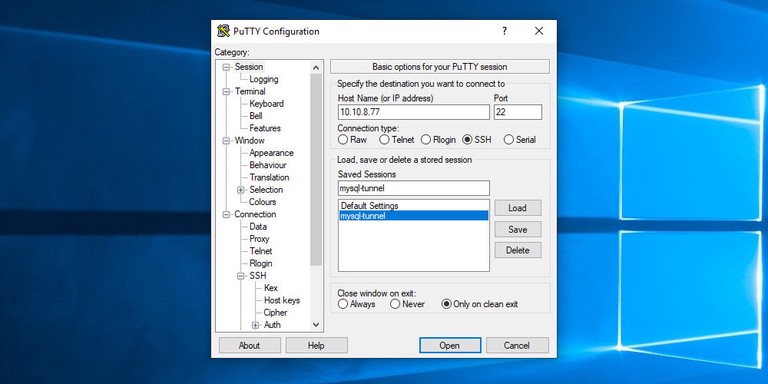
A new window asks for your username and password. Once you log in, the SSH tunnel is established.


Setting up public key authentication lets you connect without entering a password.
You can now connect to the remote database with your local MySQL client on 127.0.0.1 port 3336. For example, in HeidiSQL enter 127.0.0.1 in the Hostname / IP field, 3336 in the Port field, and the MySQL user and password in the User and Password fields:

Troubleshooting
“channel 3: open failed: connect failed: Connection refused”
SSH reached the server but could not connect to MySQL on the destination host and port. Confirm MySQL is running on the server with sudo systemctl status mysql (or mariadb) and that it listens on the port you forwarded, which is 3306 by default.
“bind: Address already in use”
The local port you chose is already taken, often by a MySQL instance running on your own machine. Pick a different free local port, for example 3337, and connect the client with the matching -P value.
The client connects to the local MySQL instead of the tunnel
This happens when you omit the port or use localhost. The mysql client treats localhost as a request to use a local socket. Always pass -h 127.0.0.1 -P 3336 so the client connects through the forwarded TCP port.
“Access denied for user”
The tunnel is working, but the MySQL credentials or host privileges are wrong. The forwarded connection arrives through the server’s loopback interface. MySQL commonly matches this to user@localhost, but with skip_name_resolve enabled it may require user@127.0.0.1. Check the available accounts with SELECT user, host FROM mysql.user;.
FAQ
Why forward to local port 3336 instead of 3306?
Port 3306 is often already used by a MySQL server running on your own machine. Forwarding to 3336, or any free port, avoids the clash. If you have no local MySQL, you can forward to 3306 and drop the -P option.
Do I need to change the MySQL bind-address on the server?
No. The forwarded connection reaches MySQL on 127.0.0.1, which is exactly where it already listens by default. That is the advantage of a tunnel over exposing MySQL to the network
.
How do I run the tunnel in the background?
Add the -f option: ssh -f -N -L 3336:127.0.0.1:3306 user@server_ip. For a tunnel that reconnects on its own, use autossh.
Does this work with MariaDB?
Yes. MariaDB uses the same protocol and default port. On recent versions the client binary is mariadb, so connect with mariadb -u db_user -p -h 127.0.0.1 -P 3336.
Conclusion
An SSH tunnel lets you reach a remote MySQL or MariaDB server securely without exposing the database port to the network. For a setup where the database must accept outside connections directly, see how to configure MySQL for remote access .
Linuxize Weekly Newsletter
A quick weekly roundup of new tutorials, news, and tips.
About the authors

Dejan Panovski
Dejan Panovski is the founder of Linuxize, an RHCSA-certified Linux system administrator and DevOps engineer based in Skopje, Macedonia. Author of 800+ Linux tutorials with 20+ years of experience turning complex Linux tasks into clear, reliable guides.
View author page