SSH SOCKS Proxy: Create a SOCKS5 Tunnel for Browsing

There are times when you want to route browser traffic through a remote server, access content from another network, or bypass an intermediate firewall.
One option is to use a VPN, but that requires installing client software on your machine and setting up your own VPN server or subscribing to a VPN service.
The simpler alternative is to route your local browser traffic through an encrypted SSH SOCKS proxy. Applications configured to use the proxy connect to the SSH server first, and the server forwards the traffic to the final destination.
An SSH SOCKS proxy changes the exit IP address and encrypts traffic between your computer and the SSH server. It does not make browsing anonymous, and DNS requests can still leak unless your browser is configured to proxy DNS through the tunnel.
This tutorial walks you through the process of creating an encrypted SSH tunnel and configuring Firefox and Google Chrome web browsers to use a SOCKS proxy.
Quick Reference
| Task | Command |
|---|---|
| Create SOCKS tunnel | ssh -N -D 127.0.0.1:9090 user@server |
| Run tunnel in background | ssh -fN -D 127.0.0.1:9090 user@server |
| Use custom SSH port | ssh -N -D 127.0.0.1:9090 -p 2222 user@server |
| Check local listener | ss -ltnp | grep 9090 |
| Test through tunnel | curl --socks5-hostname 127.0.0.1:9090 https://ifconfig.me |
Prerequisites
- Server running any flavor of Linux, with SSH access to route your traffic through it.
- Web browser.
- SSH client.
Set Up the SSH Tunnel
We will create an SSH tunnel
that opens a local SOCKS proxy on 127.0.0.1:9090 and forwards traffic through the SSH server. You can use any local port number greater than 1024; only root can open privileged ports.
Linux and macOS
If you run Linux, macOS or any other Unix-based operating system on your local machine, you can easily start an SSH tunnel with the following ssh
command:
ssh -N -D 127.0.0.1:9090 user@serverThe options used are as follows:
-N- Tells SSH not to execute a remote command.-D 127.0.0.1:9090- Opens a SOCKS tunnel bound to localhost on port9090.user@server- Your remote SSH user and server IP address or hostname.- To run the command in the background, use
ssh -fN -D 127.0.0.1:9090 user@server. - If your SSH server is listening on a port other than 22
, add
-p PORT_NUMBER.
Binding the SOCKS listener to 127.0.0.1 keeps it available only on your local machine. Once you run the command, you will be prompted to enter your user password. After entering it, the SSH tunnel will be established.
You can set up an SSH key-based authentication and connect to your server without entering a password.
Windows
Windows users can create an SSH tunnel using the PuTTY SSH client. You can download PuTTY here .
Launch Putty and enter your server IP Address in the
Host name (or IP address)field.
Under the
Connectionmenu, expandSSHand selectTunnels. Enter the port9090in theSource Portfield, and check theDynamicradio button.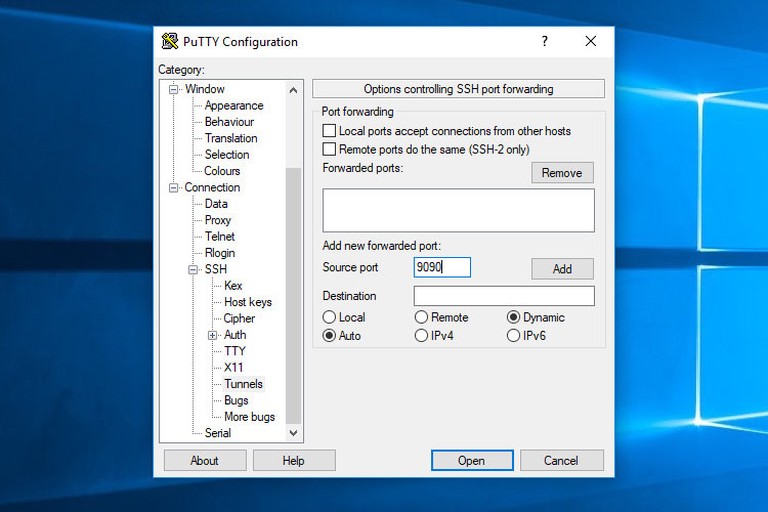
Click on the
Addbutton as shown in the image below.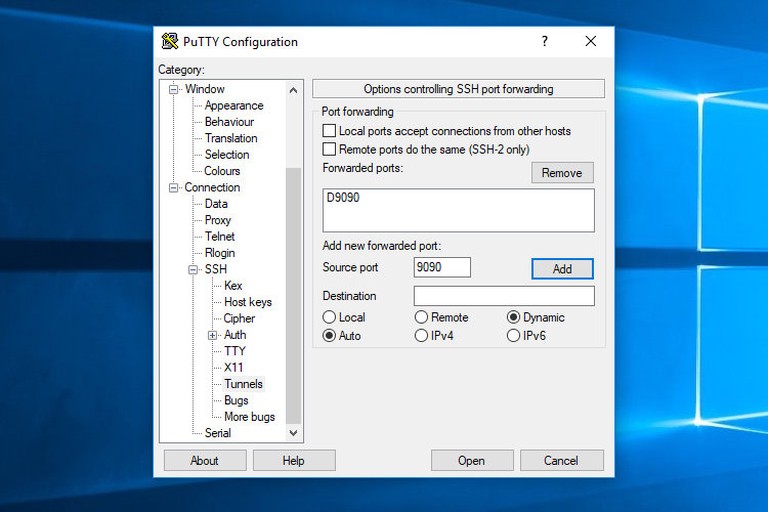
Go back to the
Sessionpage to save the settings so that you do not need to enter them each time. Enter the session name in theSaved Sessionfield and click on theSavebutton.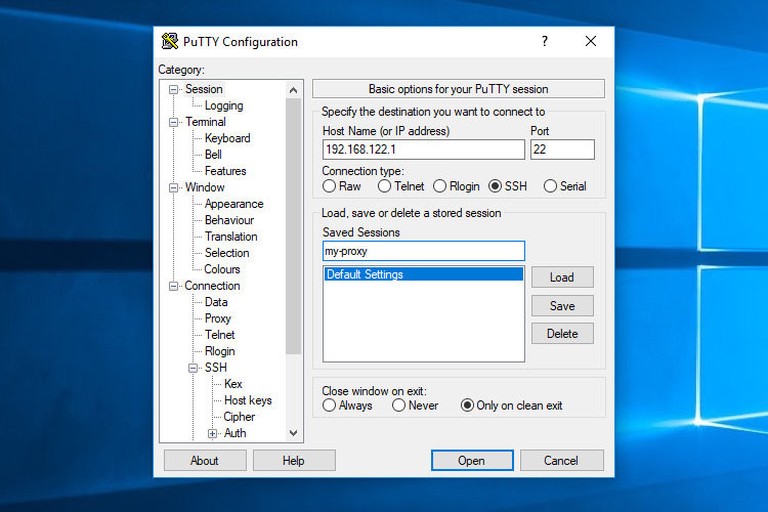
Select the saved session and log in to the remote server by clicking on the
Openbutton.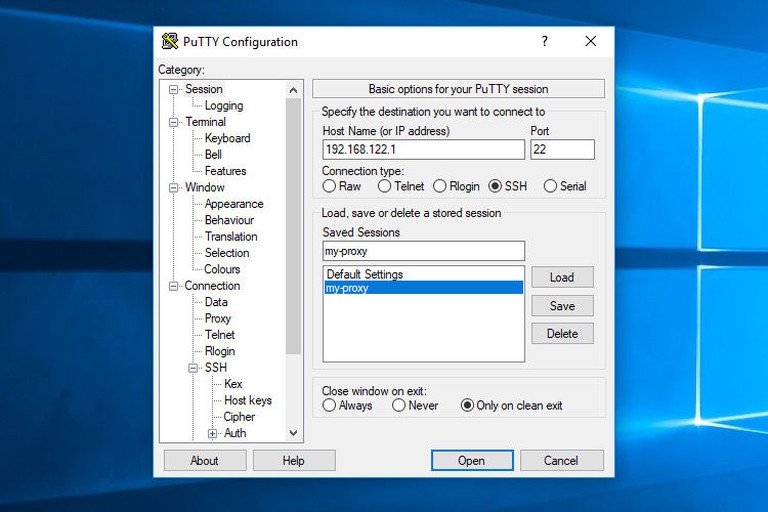
A new window asking for your username and password will show up. Once you enter your username and password you will be logged in to your server and the SSH tunnel will be started.
Setting up public key authentication will allow you to connect to your server without entering a password.


Configuring Your Browser to Use Proxy
Now that you have opened the SSH SOCKS tunnel, the last step is to configure your preferred browser to use it.
Firefox
The steps below are the same for Windows, macOS, and Linux.
In the upper right-hand corner, click on the hamburger icon
☰to open Firefox’s menu:Click on the
⚙ Settingslink.Scroll down to the
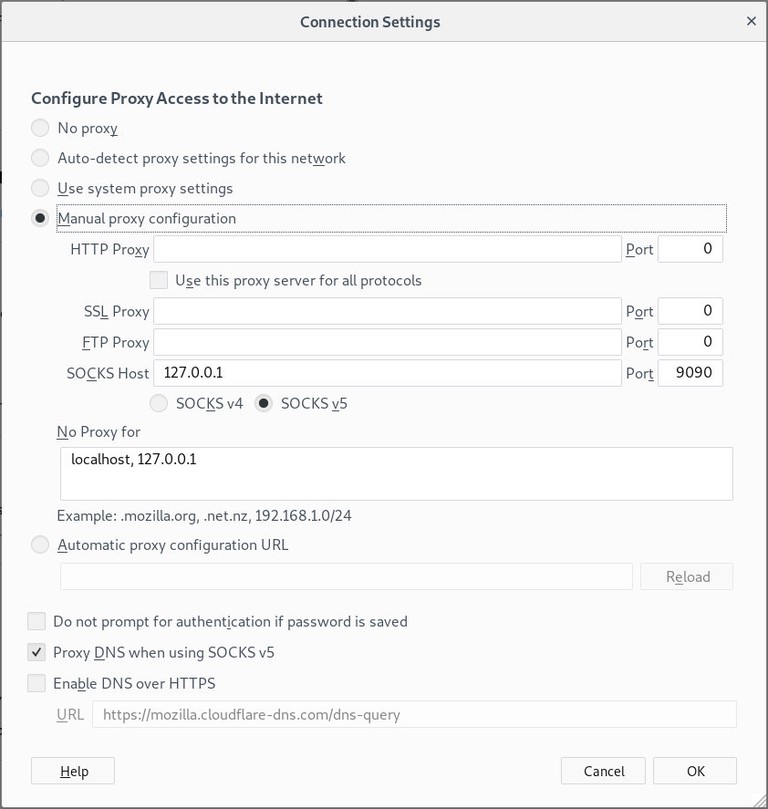
Network Settingssection and click on theSettings...button.A new window will open.
- Select the
Manual proxy configurationradio button. - Enter
127.0.0.1in theSOCKS Hostfield and9090in thePortfield. - Check the
Proxy DNS when using SOCKS v5checkbox. - Click on the
OKbutton to save the settings.
- Select the

At this point, Firefox is configured and you can browse through the SSH tunnel. To verify, open a search engine and search for “what is my ip”. The displayed IP address should be the IP address of your SSH server.
To revert back to the default settings go to Network Settings, select the Use system proxy settings radio button and save the settings.
There are also several plugins that can help you to configure Firefox’s proxy settings such as FoxyProxy .
Google Chrome
Google Chrome uses the default system proxy settings. Instead of changing your operating system proxy settings, you can start Chrome from the command line with a separate profile.
To launch Chrome using a new profile and your SSH tunnel use the following command:
Linux :
/usr/bin/google-chrome \
    --user-data-dir="$HOME/proxy-profile" \
    --proxy-server="socks5://127.0.0.1:9090"
macOS :
"/Applications/Google Chrome.app/Contents/MacOS/Google Chrome" \
    --user-data-dir="$HOME/proxy-profile" \
    --proxy-server="socks5://127.0.0.1:9090"
Windows :
"C:\Program Files (x86)\Google\Chrome\Application\chrome.exe" ^
    --user-data-dir="%USERPROFILE%\proxy-profile" ^
    --proxy-server="socks5://127.0.0.1:9090"
The profile will be created automatically if it does not exist. This way you can run multiple instances of Chrome at the same time.
To confirm the SSH tunnel is working properly, search for “what is my ip”. The IP shown in your browser should be the IP address of your SSH server.
Verifying the SOCKS Proxy
You can verify the local SOCKS listener from the terminal:
ss -ltnp | grep 9090To test the tunnel without changing browser settings, send a request through the SOCKS proxy:
curl --socks5-hostname 127.0.0.1:9090 https://ifconfig.meThe output should show the public IP address of your SSH server. The --socks5-hostname option sends DNS lookups through the SOCKS proxy, which helps avoid local DNS leaks.
Troubleshooting
bind: Address already in use
Another process is already using port 9090. Pick a different local port, such as 1080, and update the browser proxy settings to match.
Permission denied (publickey)
The SSH server did not accept your key. Check that your public key is installed on the server, or connect with the correct username and key file.
The browser still shows your local IP
Confirm the tunnel is running with ss -ltnp | grep 9090, then check that the browser is using 127.0.0.1 as the SOCKS host and 9090 as the port.
DNS still resolves locally
In Firefox, make sure Proxy DNS when using SOCKS v5 is enabled. For command-line tests, use curl --socks5-hostname instead of curl --socks5.
The tunnel closes when the terminal closes
Run the SSH command with -fN, define the tunnel in your SSH config, or start it inside tmux
or screen
.
Conclusion
For easier reuse, define the tunnel in your SSH config file or wrap it in a Bash alias that starts the tunnel and browser together.
Linuxize Weekly Newsletter
A quick weekly roundup of new tutorials, news, and tips.
About the authors

Dejan Panovski
Dejan Panovski is the founder of Linuxize, an RHCSA-certified Linux system administrator and DevOps engineer based in Skopje, Macedonia. Author of 800+ Linux tutorials with 20+ years of experience turning complex Linux tasks into clear, reliable guides.
View author page